CONTENTS
- SECTION (A) Installing on Windows
- SECTION (B) YOLO Usage on Windows
- SECTION (C) Installing on Linux
- SECTION (D) YOLO Usage on Linux
( But first ✅Subscribe to my YouTube channel 👉🏻 https://bit.ly/3Ap3sdi 😁😜)
(A) Installing YOLOv4 on Windows
(Installation method: Using CMake)
STEP 1) Download Darknet
Download Darknet zip-archive with the latest commit and uncompress it: master.zip
STEP 2) Install MSVC (Microsoft Visual Studio)
Go to MSVC: https://visualstudio.microsoft.com/thank-you-downloading-visual-studio/?sku=Community. This will download the MSVC Community edition setup exe file for you. Run it. Select the “Desktop development with C++” package as shown below and click on install.

STEP 3) Install CMake
Next, we need to install CMake GUI for Windows. (Link given below)
CMake GUI: Windows win64-x64 Installerhttps://cmake.org/download/
Select the installer for your system. I have Windows (64-bit). Download the setup, run and install it.

STEP 4) Install CUDA, cuDNN, and OpenCV on your system.
NOTE: Before running CMake GUI, we need to install CUDA, cuDNN, and OpenCV on our system. We want CUDA, cuDNN & OpenCV installed and configured on our system for the darknet executable to work with GPU.
➢ Refer to this blog to learn how to install and set up CUDA and CUDNN on Windows.
➢ You can install OpenCV on Windows using either of the 2 methods mentioned below.
METHOD 1: Install OpenCV using the Windows installer(This is for Opencv 4.5.5)
- Download OpenCV latest release Windows installer from https://opencv.org/releases/ .
- Run the exe file, extract it to C drive and install it.
- Lastly, give the following paths in the path environment variable for your System variables.

- C:\opencv\build\include
- C:\opencv\build\x64\vc14\bin
- C:\opencv\build\x64\vc14\lib
- C:\opencv\build\x64\vc15\bin
- C:\opencv\build\x64\vc15\lib
- C:\opencv\build\bin
METHOD 2: Build OpenCV from source with CUDA backend support to enable the OpenCV-DNN-CUDA module
Using method 1, you will be able to install OpenCV so that the darknet.exe file that is created using CMake will be compatible with OpenCV and run with GPU support.
Method 2 however, i.e. “Build OpenCV from source with CUDA backend support” enables the OpenCV-DNN-CUDA module which makes the inference even faster. There is a separate process to set up OpenCV-DNN-CUDA module where we build OpenCV from source. Check out my blog for it below.
STEP 5) Run CMake GUI
Once you have set up CUDA, CUDNN, and OpenCV, we have to run CMake GUI and compile darknet. Follow the steps below.
In Windows:
- Start (button) -> All programs -> CMake -> CMake (gui) ->
- look at image In CMake: Enter input path to the darknet Source, and output path to the Binaries -> Configure (button) -> Optional platform for generator:
x64-> Finish -> Generate -> Open Project ->

STEP 6) Run MSVC to build darknet
- In MS Visual Studio: Click on – Build -> Configuration Manager and tick the box for the INSTALL project under Build option. The rest 5 will already be selected. This just ensures you don’t have to run Build Solution for this again. This will run all the 6 steps at once.
- Next, in MS Visual Studio: Select: x64 and Release -> Build -> Build solution
- Find the executable file
darknet.exein the output path to the binaries you specified.
STEP 7) Setup darknet directory
Download and copy required files to setup darknet directory
- Before we can run the darknet.exe from the command prompt, you need to copy the pthreadVC2.dll from the darknet-master/3rdparty/pthreads/bin folder and place it alongside the darknet.exe file in the darknet-master main folder.
- Lastly, download the YOLOv4 weights file from here and put the weights file alongside the darknet.exe file in the darknet-master main folder.

That’s it. We have successfully installed YOLO on our windows system. We can run this with Nvidia GPU as it is installed with CUDA support.
(B) YOLO Usage on Windows
Run detector on an image
To run the detector for an image, use either of the following commands
darknet.exe detect cfg/yolov4.cfg yolov4.weights data/dog.jpg
OR
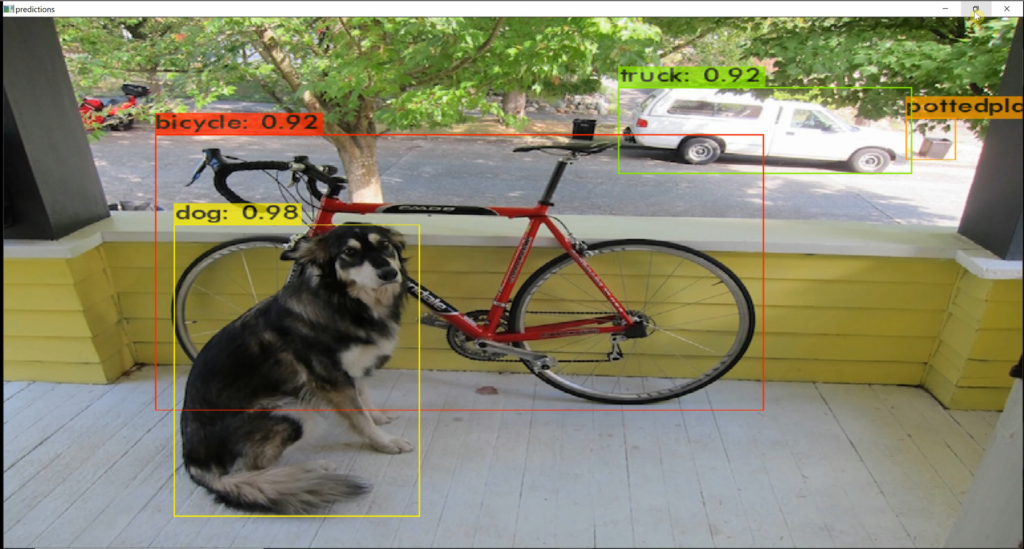
darknet.exe detector test cfg/coco.data cfg/yolov4.cfg yolov4.weights data/dog.jpgThe output will look like below

.
.

For Multiple Images
Instead of supplying an image on the command line, you can leave it blank to try multiple images in a row. Instead, you will see a prompt when the config and weights are done loading:
Once it is done it will prompt you for more paths to try different images. Use Ctrl-C to exit the program once you are done.
darknet.exe detect cfg/yolov4.cfg yolov4.weightsThe output will look like below:

Enter an image path like data/horses.jpg to have it predict boxes for that image.


Changing The Detection Threshold
By default, YOLO only displays objects detected with a confidence of .25 or higher. You can change this by passing the -thresh <val> flag to the yolo command. For example, to display all detection you can set the threshold to 0:
darknet.exe detect cfg/yolov4.cfg yolov4.weights data/dog.jpg -thresh 0Which produces:
![][all]
So that’s obviously not super useful but you can set it to different values to control what gets thresholded by the model.
Real-Time Detection on a Webcam
Running YOLO on test data isn’t very interesting if you can’t see the result. Instead of running it on a bunch of images let’s run it on the input from a webcam!
To run this demo you will need to compile Darknet with CUDA and OpenCV. We have already compiled darknet with CUDA using CMake in section A above.
Now, to run the detector on a live webcam run the command:
darknet.exe detector demo cfg/coco.data cfg/yolov4.cfg yolov4.weightsYOLO will display the current FPS and predicted classes as well as the image with bounding boxes drawn on top of it.

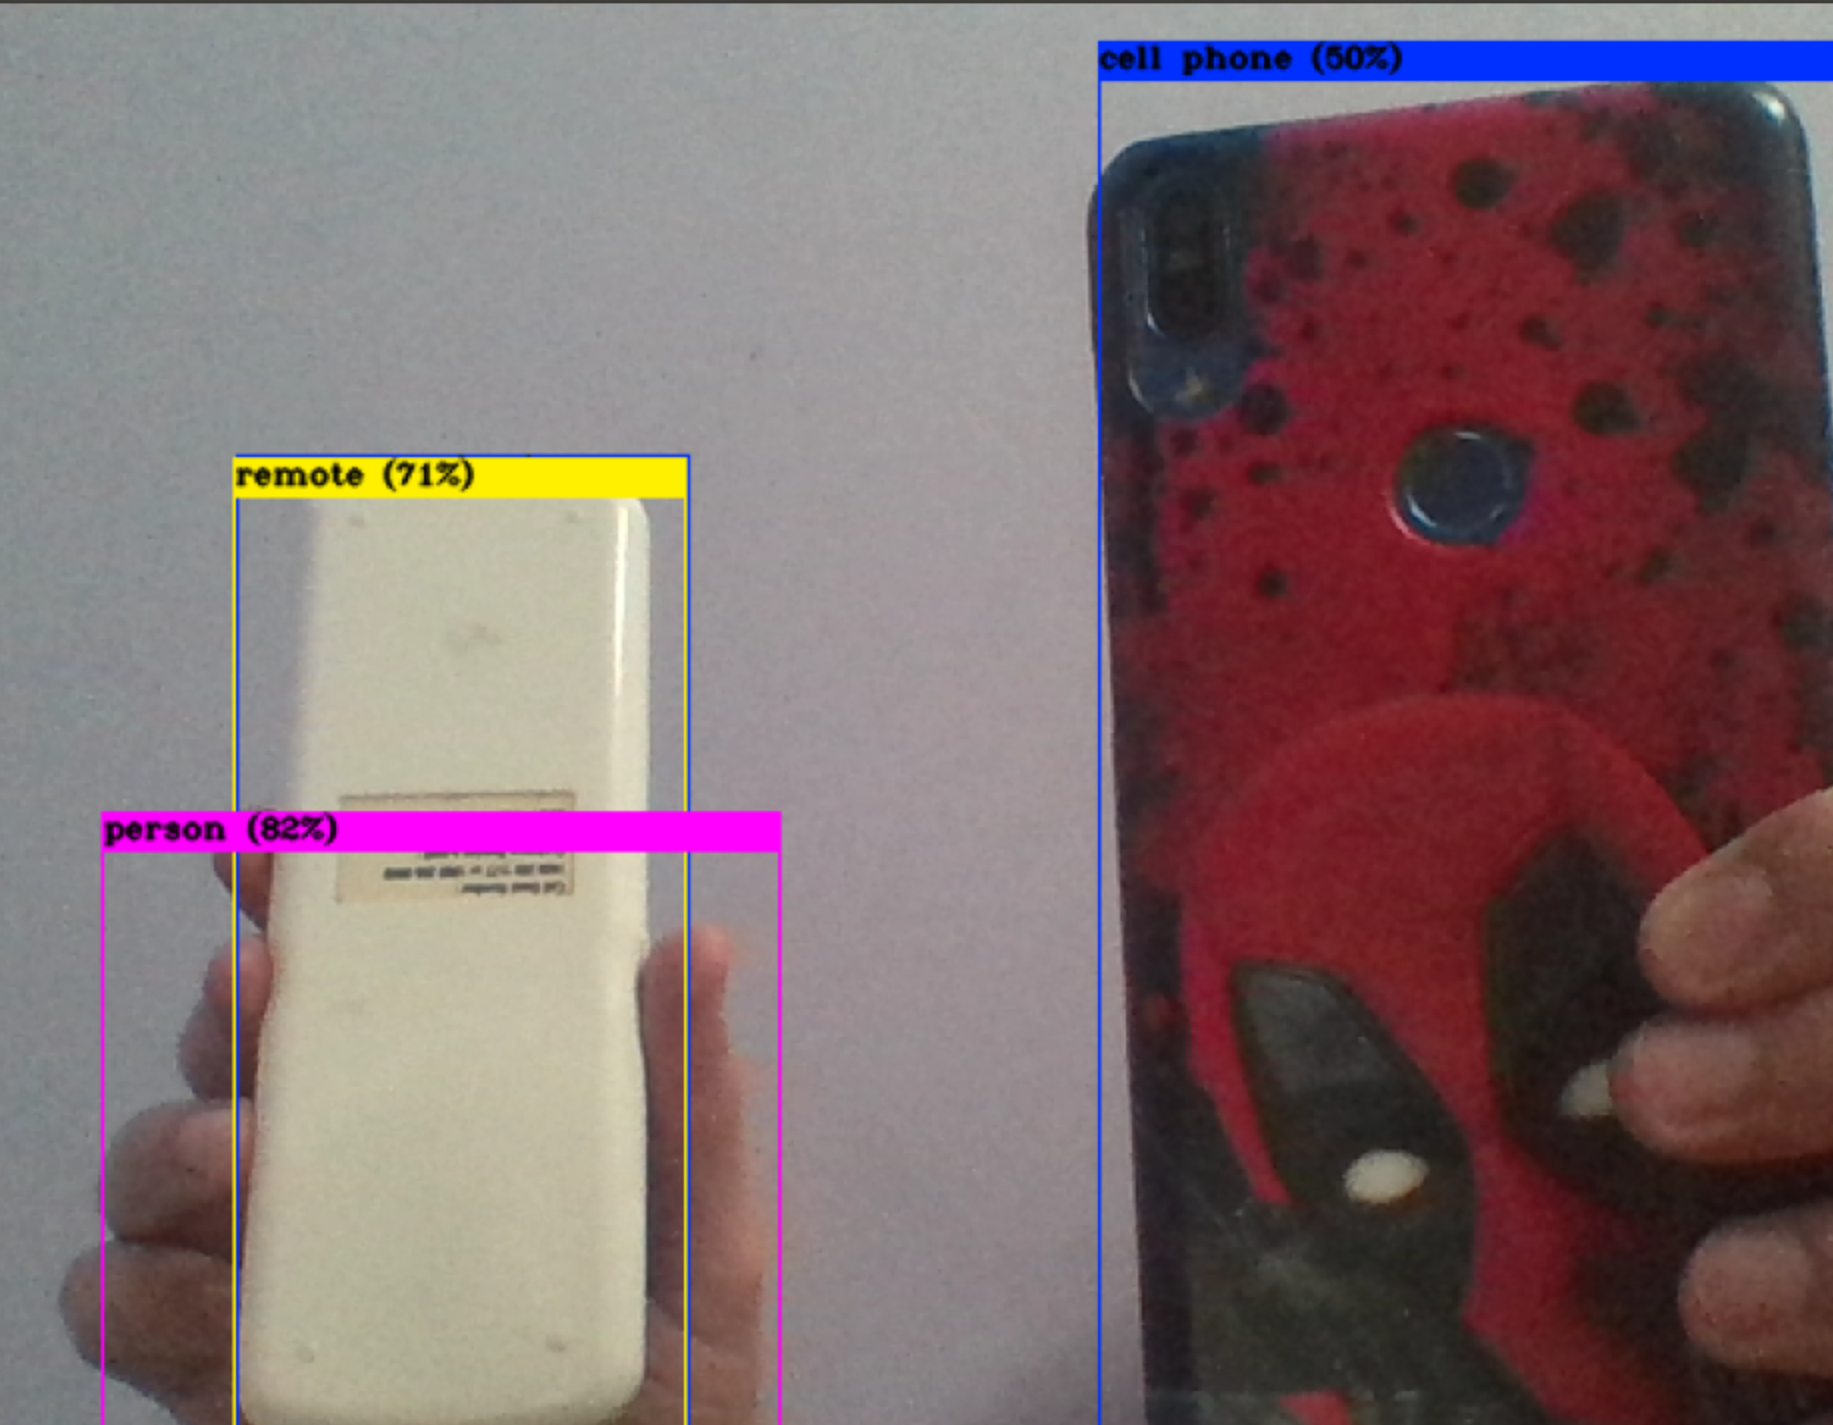
You will need a webcam connected to the computer that OpenCV can connect to or it won’t work. If you have multiple webcams connected and want to select which one to use you can pass the flag -c <num> to pick (OpenCV uses webcam 0 by default).
Detection on a Video
You can also run it on a video file if OpenCV can read the video:
darknet.exe detector demo cfg/coco.data cfg/yolov4.cfg yolov4.weights <video file>You can also save the output of a video file using the following command.
darknet.exe detector demo cfg/coco.data cfg/yolov4.cfg yolov4.weights <video file> -out_filename <output_video file>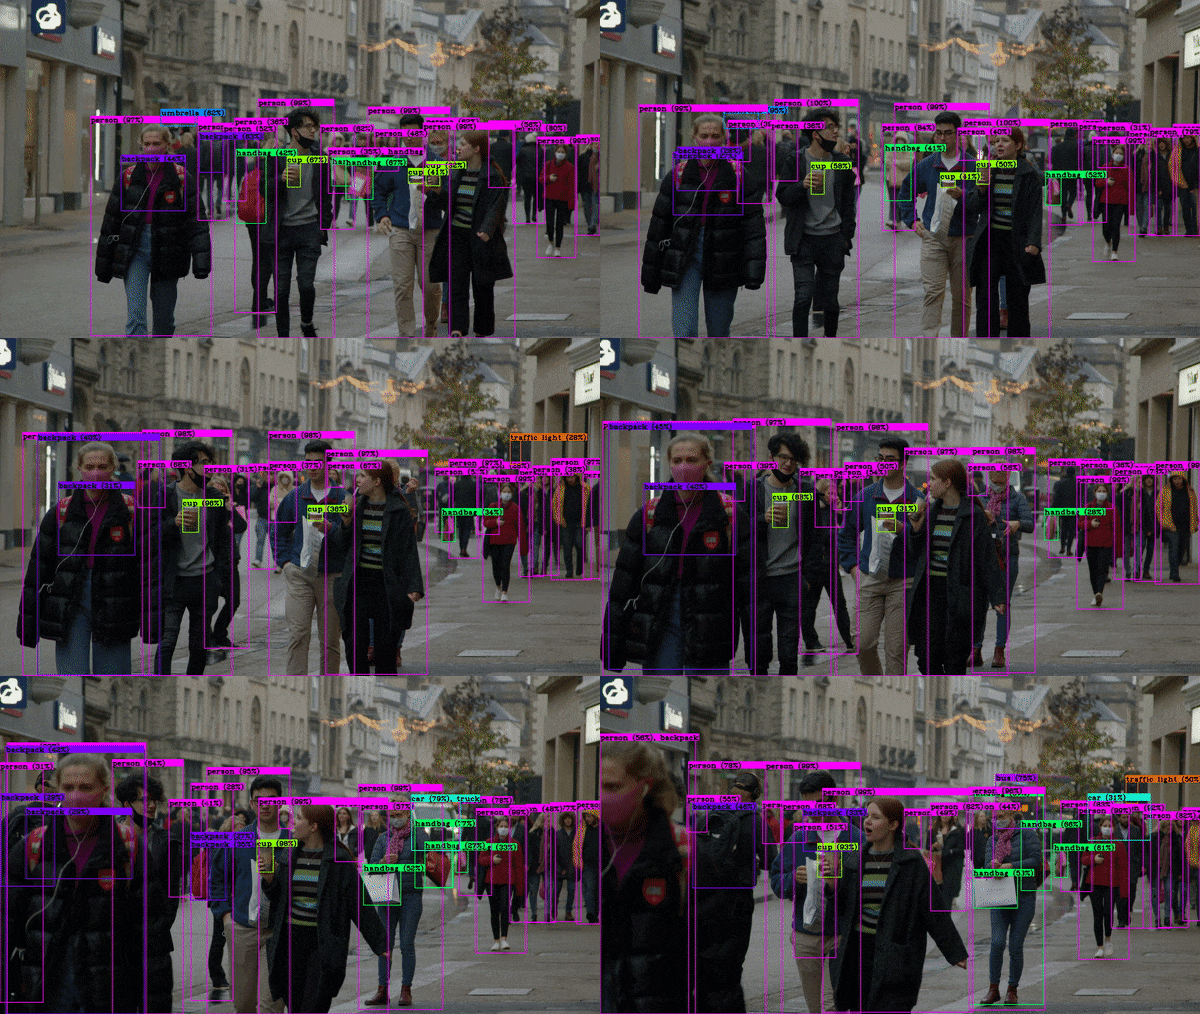
To read more about the YOLO commands and usage, visit pjredde’s site and AlexeyAB’s GitHub.
You can also watch my YouTube videos on YOLO mentioned below at the bottom under “My YouTube Videos” section to learn more about YOLO installation and training.
(C) Installing YOLOv4 on Linux
(Compile on Linux using make) Done in 5 steps below:
STEP 1) Open a terminal and clone darknet
Clone the darknet git repository using the following command. Visit official AlexeyAB’s GitHub to learn more about darknet.
git clone https://github.com/AlexeyAB/darknet.git
STEP 2) Install CUDA, cuDNN, and OpenCV on your system.
NOTE: We need to have CUDA, cuDNN & OpenCV installed and configured on our system for the darknet executable to work with GPU.
➢ Refer to this blog to learn how to install and set up CUDA and CUDNN on Linux.
➢ You can install OpenCV on Linux using either of the 2 methods mentioned below.
METHOD 1: Install OpenCV from Ubuntu Repository.
The following command using apt install will install an older version of OpenCV. Right now the available version using this is at 3.2 while the official OpenCV release is at 4.5.3.
sudo apt update
sudo apt install python-opencv
sudo apt install libopencv-dev
OR use pip install. This will install the latest OpenCV release on your system. You need to have pip installed on your system. (Use pip3 if you have python3 and pip3 separately installed along with python2.)
pip install opencv-python
sudo apt install libopencv-dev
METHOD 2: Build OpenCV from source with CUDA backend support to enable OpenCV-DNN-CUDA module
Using method 1, you will be able to install OpenCV so that the darknet.exe file that is created using the make command will be compatible with OpenCV and run with GPU support.
Method 2 however, i.e. “Build OpenCV from source with CUDA backend support” enables the OpenCV-DNN-CUDA module which makes the inference even faster. There is a separate process to set up OpenCV-DNN-CUDA module where we build OpenCV from source. You can also refer to my blog below on how to build OpenCV from source with the OpenCV-DNN-CUDA module on Ubuntu 18.04:
STEP 3) Make changes in the Makefile
Make changes in the Makefile according to your requirements. There are various changes you can make in the Makefile as mentioned on this link.
For beginners just set GPU, CUDNN, CUDNN_HALF, and OPENCV to 1.
GPU=1
CUDNN=1
CUDNN_HALF=1
OPENCV=1
Next, set the ARCH to your GPU Architecture. You can find your GPU architecture(compute capability) here. For eg: The CC for my Nvidia GPU is 6.1 so I will use the following line:
ARCH= -gencode arch=compute_61,code=[sm_61,compute_61] 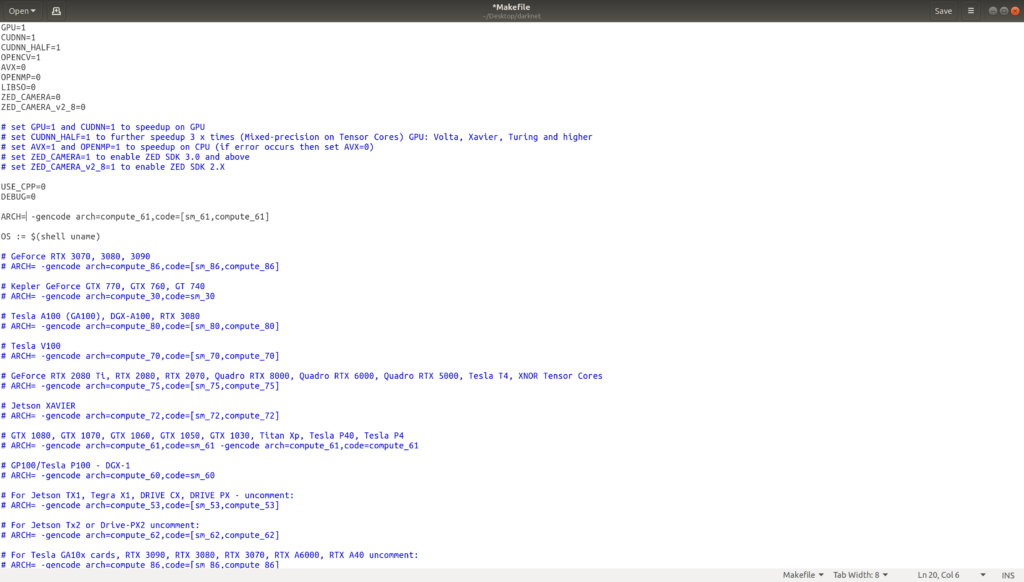
STEP 4) Run make command
Navigate to the darknet directory and run the make command.
cd darknet
make
The output will look like below:

This creates an executable file named darknet inside the darknet directory.
STEP 5) Download the YOLOv4 weights file
Download the YOLOv4 weights file using the following command.
wget https://github.com/AlexeyAB/darknet/releases/download/darknet_yolo_v3_optimal/yolov4.weights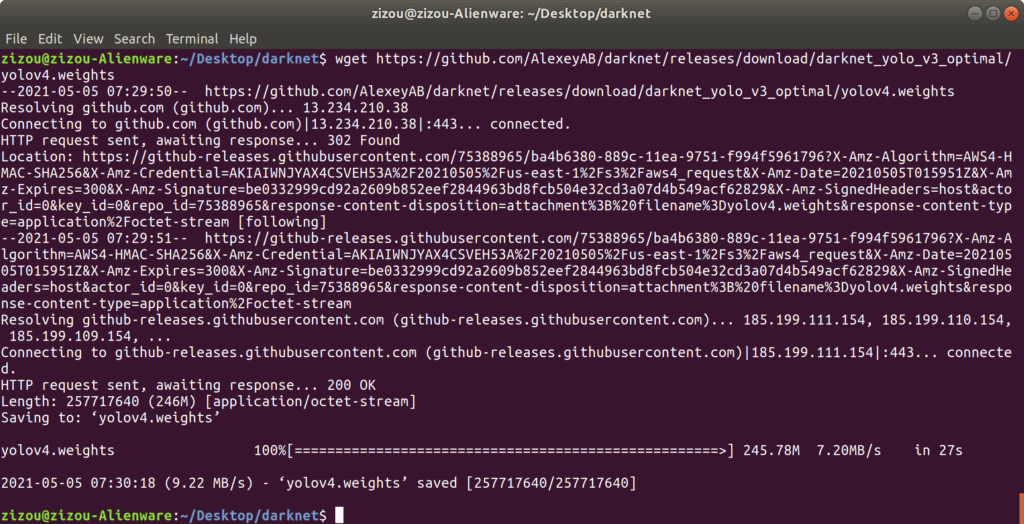
Now we have set up our Yolo-darknet environment. We have created the darknet executable file by setting the parameters in the Makefile and running the make command. We have also downloaded the yolov4.weights file. The darknet folder contents will look like below:

(D) YOLO Usage on Linux
The usage for YOLO on Linux is the same as in Windows except as mentioned below.
To run Darknet on Linux use examples from this article, just use ./darknet instead of darknet.exe.
Run detector on an image
To run the detector for an image, use either of the following commands
./darknet detect cfg/yolov4.cfg yolov4.weights data/dog.jpg
OR
./darknet detector test cfg/coco.data cfg/yolov4.cfg yolov4.weights data/dog.jpgThe output will look like below:
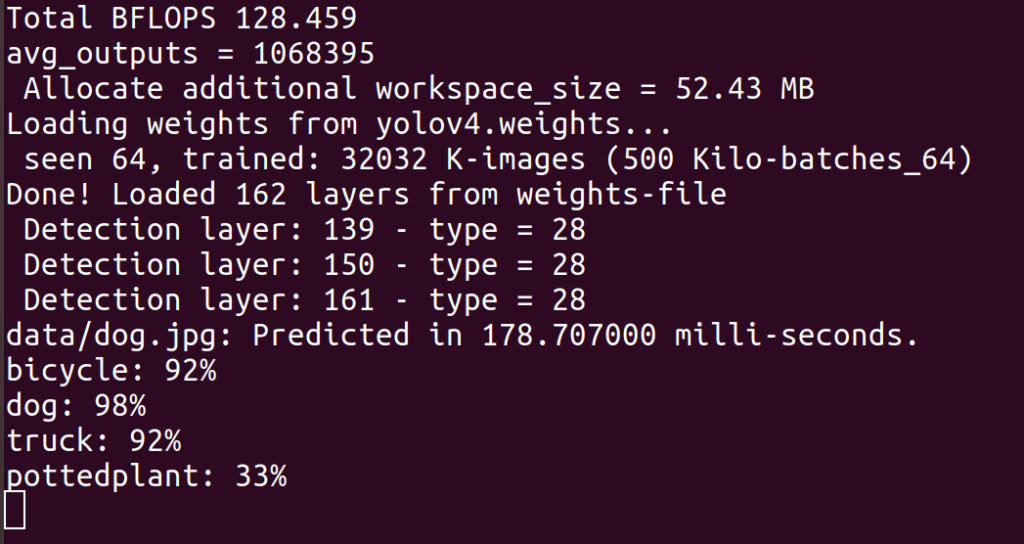
.
.
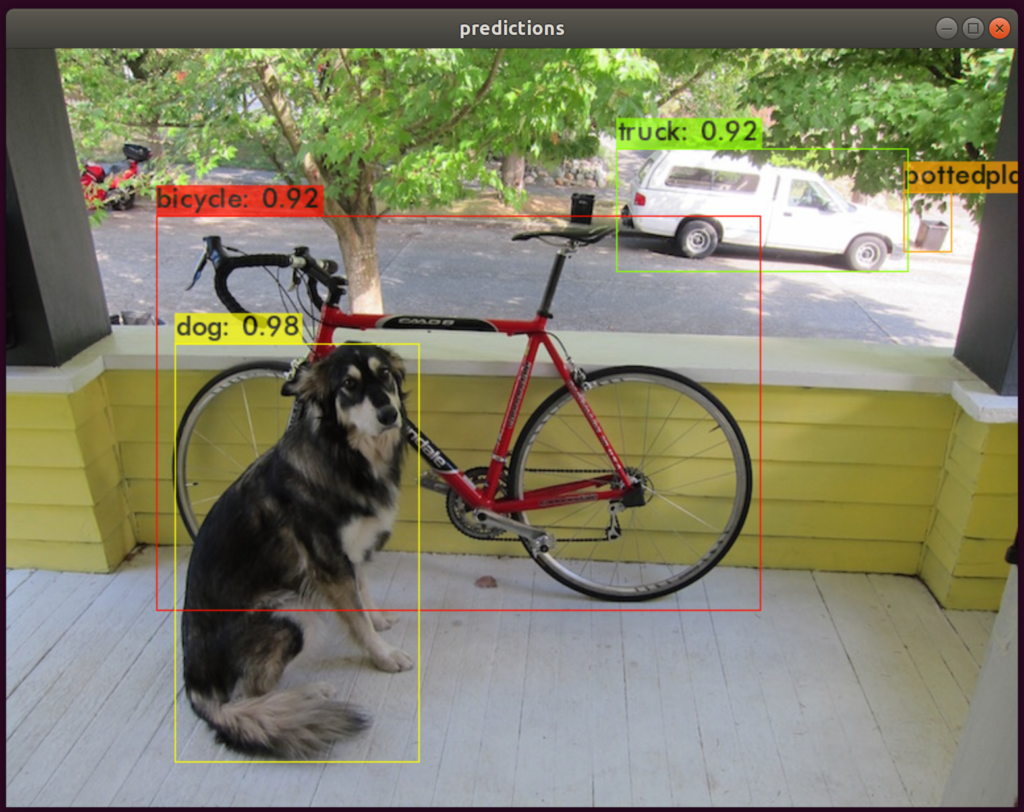
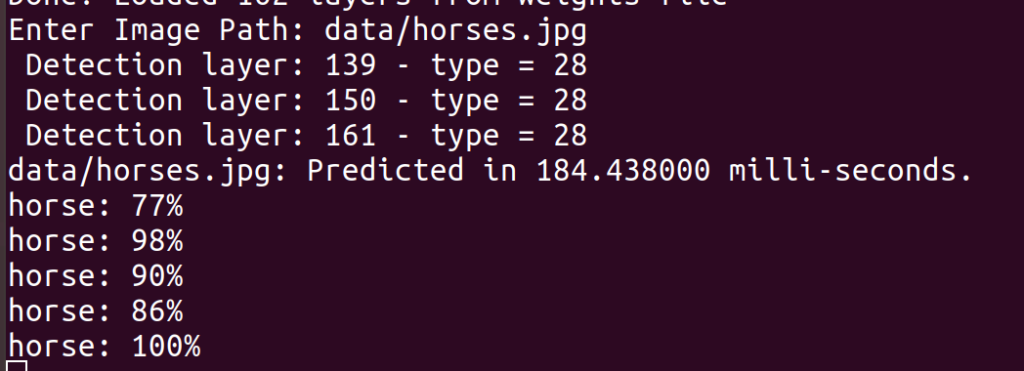
For Multiple Images
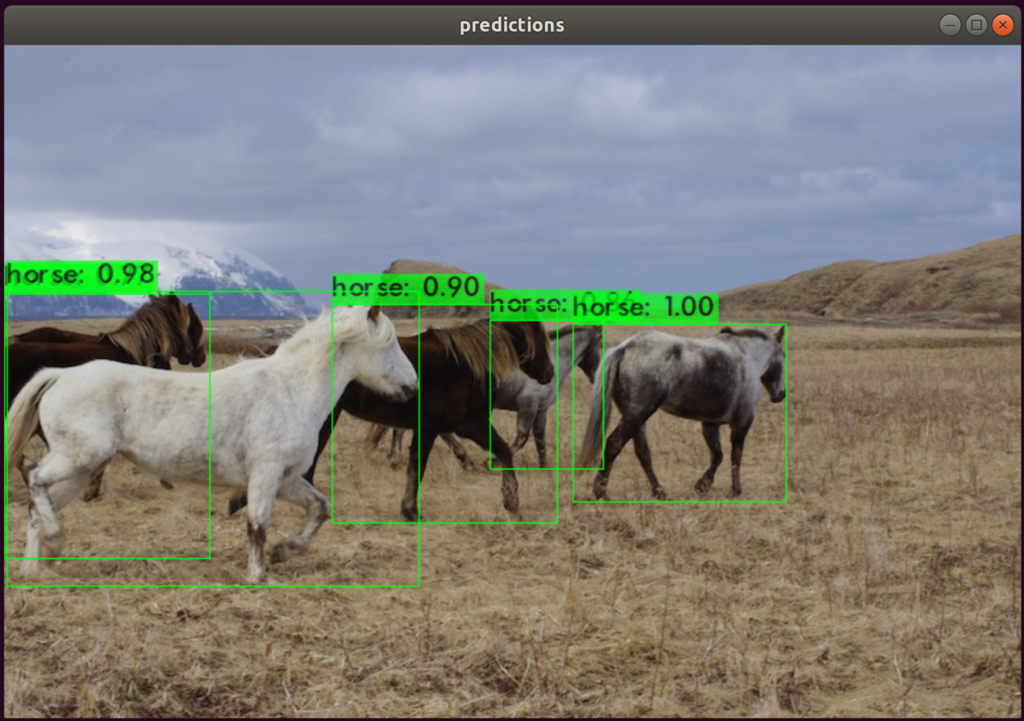
Instead of supplying an image on the command line, you can leave it blank to try multiple images in a row. Instead you will see a prompt when the config and weights are done loading:
Once it is done it will prompt you for more paths to try different images. Use Ctrl-C to exit the program once you are done.
./darknet detect cfg/yolov4.cfg yolov4.weightsThe output will look like below:

Enter an image path like data/horses.jpg to have it predict boxes for that image.
Changing The Detection Threshold
By default, YOLO only displays objects detected with a confidence of .25 or higher. You can change this by passing the -thresh <val> flag to the yolo command. For example, to display all detection you can set the threshold to 0:
./darknet detect cfg/yolov4.cfg yolov4.weights data/dog.jpg -thresh 0Which produces:
![][all]
So that’s obviously not super useful but you can set it to different values to control what gets thresholded by the model.
Real-Time Detection on a Webcam
Running YOLO on test data isn’t very interesting if you can’t see the result. Instead of running it on a bunch of images let’s run it on the input from a webcam!
To run this demo you will need to compile Darknet with CUDA and OpenCV. We have already compiled darknet with CUDA using CMake in section A above.
Now, to run detector on a live webcam run the command:
./darknet detector demo cfg/coco.data cfg/yolov4.cfg yolov4.weightsYOLO will display the current FPS and predicted classes as well as the image with bounding boxes drawn on top of it.
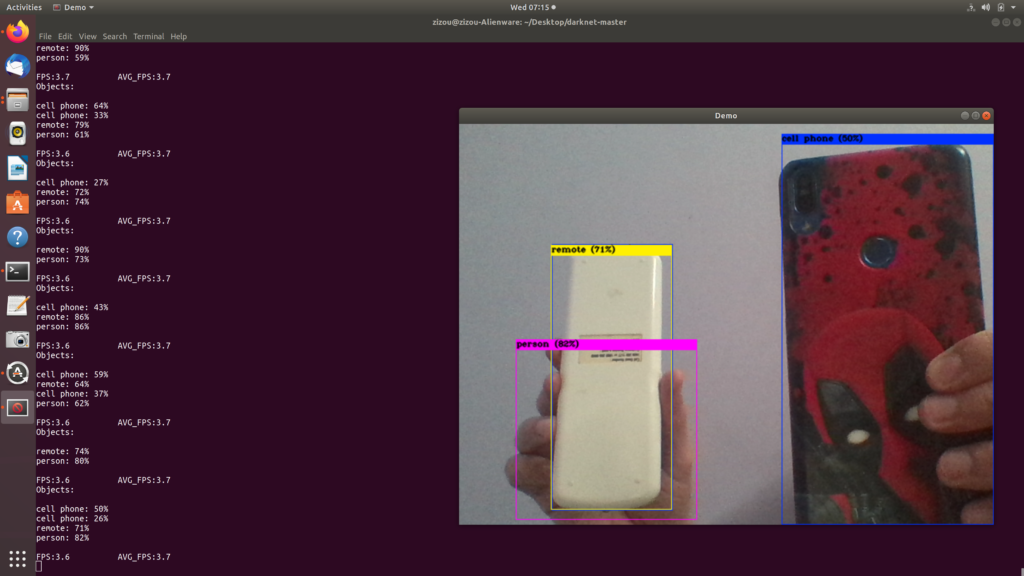
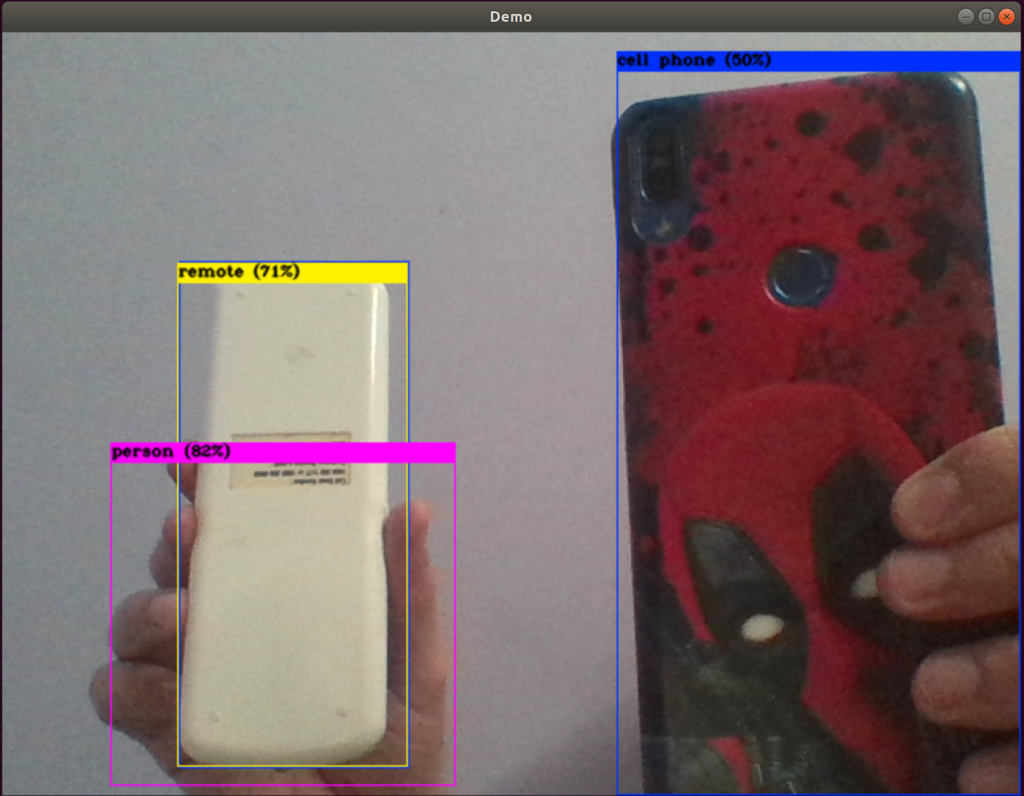
You will need a webcam connected to the computer that OpenCV can connect to or it won’t work. If you have multiple webcams connected and want to select which one to use you can pass the flag -c <num> to pick (OpenCV uses webcam 0 by default).
Detection on a Video
You can also run it on a video file if OpenCV can read the video:
./darknet detector demo cfg/coco.data cfg/yolov4.cfg yolov4.weights <video file>You can also save the output of a video file using the following command.
./darknet detector demo cfg/coco.data cfg/yolov4.cfg yolov4.weights <video file> -out_filename <output_video file>
To read more about the YOLO commands and usage, visit pjredde’s site and AlexeyAB’s GitHub.
You can also watch my YouTube videos on YOLO mentioned below under “My YouTube Videos” section to learn more about YOLO installation and training.


